
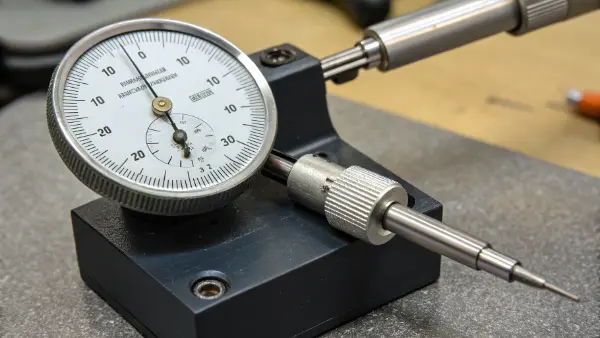
Do you struggle to measure tiny gaps? Bad measurements can ruin good parts. I will show you how to use a dial indicator the right way. This tool makes finding exact sizes easy and stress-free.
A dial indicator is a precise tool that measures very small distances. To use it, you lock it in a strong base. Then, you place the tip flat against your part. Next, you turn the dial face to zero. Finally, you move the part and read the needle to find the exact change in size.
You might think measuring with this tool is hard. But learning the basic rules will make you a master in no time.
What are the four basic rules for measuring with a dial indicator?
Are your readings jumping around? Broken setups cause bad data. You need strict rules to fix this. I will share the four main rules I use every day to get perfect results.
The four basic rules for measuring with a dial indicator are simple. First, keep your tools and parts perfectly clean. Second, lock the indicator tightly in a magnetic stand. Third, make sure the measuring tip sits straight against the part. Fourth, never push the tip sideways to avoid breaking the delicate gears inside.
Let me tell you a story about a mistake I made. Years ago, I worked on a big CNC project. I did not clean my table. A tiny metal chip sat under my magnetic base. The tool moved during the test. My readings were completely wrong. We threw away three good metal parts. I lost time and money. That day, I learned to follow rules.
Rule One: Clean Everything First
Dirt is the enemy of good math. Dust or oil changes your reading. Always wipe the part. Wipe the base. Make sure nothing blocks the tool. Clean tools give good numbers.
Rule Two: Lock It Tight
Your tool needs a strong home. Use a heavy magnetic stand. Turn the magnet on. Tighten all the knobs. If you push the stand and it moves, you must tighten it more. A loose stand is useless.
Rule Three: Keep It Straight
The needle needs to push straight in. We call this perpendicular. If the tip hits the part at a bad angle, the math changes. The reading will show less movement than the real movement. You want the real size.
Rule Four: Protect the Tip
The tip goes in and out. It does not go left and right. Never push it sideways. Sideways force breaks the small gears inside. Also, you must calibrate the tool often. Calibration keeps the tool true. Always put the tool in a hard box when you finish.
I made a simple table to help you remember these rules.
| Rule Number | What to Do | Why It Matters |
|---|---|---|
| 1 | Clean the surface | Stops bad bumps |
| 2 | Use a strong base | Stops unwanted movement |
| 3 | Keep it straight | Gives the true size |
| 4 | Push straight in | Saves the gears |
Follow these rules every single time. Your parts will match your drawings. Your boss or client will smile.
How do you use a dial indicator step by step?
Does setting up a dial indicator feel confusing? Guessing the steps leads to scrap parts. I will break down the process into easy steps. You will measure like a pro today.
To use a dial indicator step by step, first clean your workspace. Second, attach the indicator to a magnetic base and lock it. Third, push the tip gently against the part to add tension. Fourth, turn the outer ring until the needle points to zero. Finally, move the part slowly and watch the needle move.
I still remember teaching a new worker named Tom. He tried to measure a robot arm joint. He forgot to set the dial to zero. His numbers meant nothing. I had to show him the right steps. Now I will show you the exact same steps.
Step One: Build the Setup
Find a clean metal table. Put your magnetic base on it. Turn the switch to "On". Put the indicator on the arm. Tighten the screws. The tool must feel like a rock. You must not feel any wiggle.
Step Two: Touch the Part
Move the arm so the tip touches your part. Do not just touch it lightly. Push it in a little bit. We call this preload. The needle should move a few lines. This lets the needle go forward and backward later. You need to practice using the same force every time. Same force means same results.
Step Three: Find Zero
Look at the big circle face. It has a ring on the outside. We call it the bezel. Turn the bezel. Stop when the big zero lines up with the long needle. Now you have a starting point. This is your home base.
Step Four: Move and Watch
Slowly move your part. Maybe you slide it. Maybe you spin it. Watch the needle. Count the lines it moves away from zero. Do not rush this step.
Here is a table showing common checks.
| Task | How to Move the Part | What to Watch |
|---|---|---|
| Runout | Spin the round part | Highest and lowest number |
| Flatness | Slide part flat | Total change from zero |
| Backlash | Push and pull part | The gap before parts catch |
These steps work for almost every job. You just need a little practice to get fast.
How to properly read a dial indicator?
Do all those tiny lines hurt your eyes? Reading the dial wrong wastes expensive material. I will teach you the secret to reading the face. You will never write down the wrong number again.
To properly read a dial indicator, first look at the small numbers printed on the face. This tells you what one small line means. Next, look at the small inside dial to see how many full turns the big needle made. Finally, count the lines the big needle moved past zero and add them together.
One time, a client sent me a drawing for a custom engine case. The tolerance was very tight. I read my dial as 0.01 inches. But the tool was actually a metric tool. It was 0.01 millimeters! I made the part way too big. I had to buy new metal and start over. That mistake taught me to always read the face first.
Know Your Tool
Every dial has text on the face. It usually says "0.001 in" or "0.01 mm". This number is very important. It tells you the value of one single small line. If you do not read this, you are just guessing. Guessing is bad for business.
Check the Small Hand
Many indicators have two needles. One is big. One is small. The small needle sits in a tiny circle. This is the turn counter. When the big needle makes one full circle, the small needle moves one number. Always read the small needle first. It tells you the big changes.
Count the Big Hand
Next, look at the big needle. Count the lines from zero. If your tool says 0.001 inches, and the needle moved ten lines, the answer is 0.010 inches. You just add the lines up.
Here is a table to show how to add the numbers.
| Small Hand Shows | Big Hand Shows | Total Measurement |
|---|---|---|
| 1 full turn (0.100) | 15 lines (0.015) | 0.115 inches |
| 0 turns (0.000) | 5 lines (0.005) | 0.005 inches |
| 2 turns (0.200) | 50 lines (0.050) | 0.250 inches |
Take your time. Look straight at the dial. If you look from the side, you might read the wrong line. Looking straight gives you the truth.
How to read a .005 dial indicator?
Are strange numbers on the dial confusing you? Some tools use different scales. This causes big headaches. I will show you exactly how to read a point zero zero five indicator. It is easier than you think.
To read a .005 dial indicator, you must know that every single line equals 0.005 inches or millimeters. First, see if the needle moved past any numbered marks. Then, count the single lines past that mark. Multiply the number of single lines by 0.005. Add this to your starting number.
I once bought a big box of old tools at a shop sale. Inside, I found a strange dial indicator. I tried to use it on a robot joint. The numbers did not make sense. I looked very closely. The face said 0.005. I had to change my way of thinking. Let me explain how it works.
What Does 0.005 Mean?
Most standard tools use 0.001 lines. A 0.005 tool is different. Each tiny gap between two lines is much bigger. One jump means 0.005 units. You must do different math in your head. You cannot use the old rules.
The Counting Rule
You do not count by ones anymore. You count by fives. If the needle moves one line, you write 0.005. If the needle moves two lines, you write 0.010. If the needle moves three lines, you write 0.015. It is like counting nickels instead of pennies.
Avoiding Mistakes
People make mistakes because they forget the scale. They see three lines and think "three". But the answer is fifteen. Always double check your math. You can write it down on a paper. Writing things down stops silly errors.
Here is a table to help you count fast.
| Number of Lines | Multiplication Math | Total Value |
|---|---|---|
| 1 line | 1 x 0.005 | 0.005 |
| 2 lines | 2 x 0.005 | 0.010 |
| 4 lines | 4 x 0.005 | 0.020 |
| 10 lines | 10 x 0.005 | 0.050 |
Use a calculator if you feel unsure. After a few tries, you will know the numbers by heart. Your robotic parts will fit together perfectly. You will save so much time. Always clean the tool when you are done. Put it back in its safe box.
Conclusion
A dial indicator is a great tool for exact sizes. Follow the simple rules. Lock the base tight. Count the lines carefully. Your machining projects will be perfect every time.